
Now, in the past when someone mentioned distraction for my joints, I thought they meant using something to take my mind off them. But in reality, doing Joint Distraction can create more ‘space’ inside the joint complex and thus improve our mobility.
Joint Distraction is simply a method to release the pressure within the capsule and hopefully influence the joint health positively.

Personally I struggle with the whole sitting around and trying stretch thing, I do find it boring just as I assume so do you!?
But in recent times I have seen top athletes using bands on Instagram and wondered what they are doing so I took a look around and came across some information about Joint Distraction and its benefits
More Space means more movement
Most of the joints in our bodies that we use for everyday life and athletics are called Synovial Joints, which contain the lubricating Synovial fluid (the oil in our engine as an example). When we inevitably get to tight or our movement mechanics are of a poor quality, the articulating surfaces inside the joint can become compressed (pushed together) and problems occur.
- Some of those Problems
Once that space within our Joint becomes compromised a host of physiological structures in the joint, such as our Meniscus, Laburm, Cartilage, Synovial membranes, Bursa and even the bone, become structural compromised and/or deteriorate. - Bad to Worse
When we have a loss support of our joints’ physiological ‘cushions,’ articulating (moving) surfaces of the joint will literally start to sheer (wear away) each other unless there is some kind of intervention.
And just like any other Joint when they are compressed they create an environment where the articulating (moving) surfaces with cause damage to one another and limit mobility.
Stop the Problem
Joint Distraction is used often in a physical therapy setting, but it can easily be applied by individuals like you and myself virtually anyway, at home, in the gym, down at the track.
What is a Joint Distraction Exercise?
Joint Distraction exercises use resistance band, foam roller or another object to create a ‘vector force’ that literally acts as a ‘wedge’ to separate the joint surfaces from one another. This separation of the articulating surfaces will provide more ‘space’ for Synovial fluid to fill the joint, reduce the amount of friction and allows for much more fluid motion.
In short, we use an object to wedge the joint open for more fluidity of movement.
Here are some illustrations depicting the mechanics principles behind a Joint Distraction exercise.


Upgrade Mobility
So if we include some Joint Distraction along with the boring stretching routine and also include some soft tissue massage, you have a very powerful trilogy of elements to improve your mobility and flexibility for performance
What you need:
You need a relatively strong resistance band, there is no getting away with this, it needs to be able to resist your body weight but also have some give so as not to dig into your muscle and allow some fluid movement through a range of motion.
Let’s learn some Joint Distraction exercises!
Joint Distraction: Prone Ankle Stretch
Improve the mobility at the ankle and foot, which will also affect how the rest of the body moves, especially in agility drills or running, this should always start your routine so that pay some good attention to you ankles, they do after all take all the work when running.
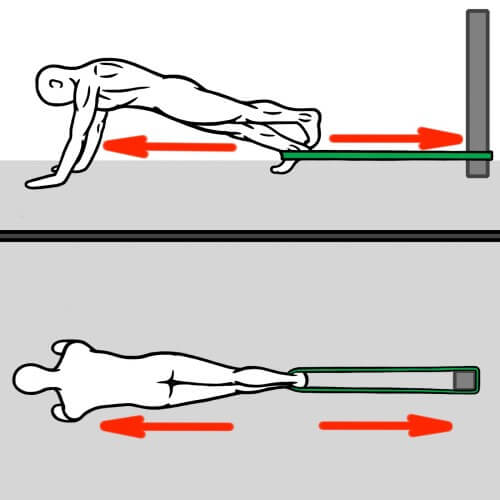
First, anchor the resistance band securely to a rack or pole. (Make sure that the band is secure, and so the rack!)
Next, wrap the band around your ankle and walk away from the anchor until the band gets tight and offers a firm resistance. Also, make sure that the band is positioned across the front of the ankle where the shinbones intersect with the foot.
Once the band is in place around the front of the ankle, walk the hands out on the ground until you are in a plank position. In this position, the band will begin to pull your foot away from your shinbone and thus make more ‘space’ in the ankle joint itself.
Next, adjust your positioning to explore different lines of action (pull of stretch) thought your foot, ankle and calf. Every time you modify your position, you essentially change the stretch and will feel different sensations through your ankle, which is good. We want to find the positions that work best for you. So, be creative and find all the positions that work best for you!
Finally, add in a PNF Stretching technique while performing this Joint Distraction exercise. Simply, cycle through a few Contract-and-Relax phases when you are the end Range of Motion in this stretch and allow your muscles to release, which will help the joint to open more.
Perform a Joint Distraction on each leg for 30+ seconds.
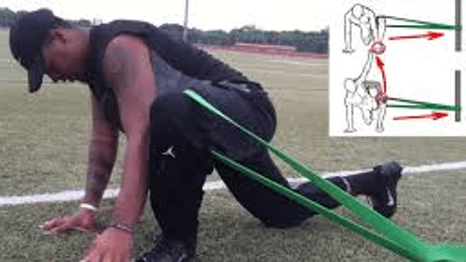
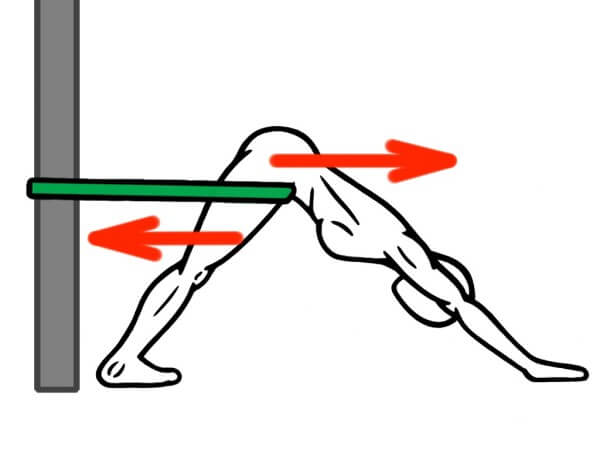
Joint Distraction: Kneeling Lunge
This exercise will target the Hip Flexors and increase the Range of Motion in Hip Extension, which will make a positive difference in the way that you run, jump, squat and more. This exercise is strongly recommended for those among us that sit much during the day. Open up those Hips and restore a full Range of Power to your Hip Extension!
Anchor the resistance band securely to a rack or pole. Again rules about being secure and safe must be adhered to.
Next, wrap the band around the top of your thigh as high as possible and kneel on the ground with the front of your hips pointing towards the anchor.
Now, slide your knee back as far as possible as you use a pole to help coordinate a stable and neutral spine. Brace your torso against the pole at the following three points of contact:
Three Points of Contact-
Back of Head
Rib Cage Behind the Heart
Tailbone
Next, make plenty of slight adjustments to change the line of action (stretch) through your Hips and Quadriceps. Explore different positions and the various sensations that you will feel with each. Once you have found a line of action that indicates the most tightness for you, then you are ready to apply a PNF Stretching technique to elicit a release in the muscles and further open up Hip Extension.
Now, we add in a PNF Stretching technique. With this exercise, we can apply either PNF technique: Contract-and-Relax or Contract-and-Hold. Both will effectively release tightness in the muscles and improve the Range of Motion of the Hip. So, try each technique on your own and repeat the one that you feel work best!
Perform a Joint Direction on each hip for 30+ seconds.
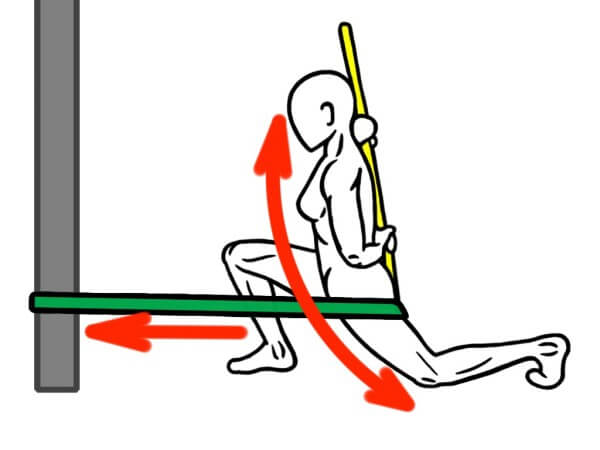
Joint Direction: Hip Abduction
This exercise will aim to increase the Range of Motion of Hip Abduction and help stretch your Adductors (groin) muscles. This exercise is ideal for anyone that experienced difficulty with the Lateral Lunges, Squats or the Kickstand stretch.
Anchor the resistance band around a rack or a pole. Safety first, please!
Next, wrap the band around your thigh, up close towards your knee, as you position yourself in a Spider-Man Lunge (a longer version of a Kneeling Lunge). Make sure that band is pulled tight and your body is perpendicular to the band.
Now, make plenty of small adjustments and explore the different sensations that this stretch will offer you. You will want to keep modifying your position until your feel that you have found a line-of-action (stretch) that works the best.
Also, you can use your hand to help press the knee out wider. Or rotate through the torso and reach the arm up into the sky, which will rotate the hips slightly and create a degree of External Rotation in the Hip Socket.
Next, add in the Contract-and-Relax PNF Stretching technique. This combination will greatly help to lengthen of your Adductors (groin) muscles and increase the Range of Motion in Hip Abduction.
Perform a Joint Direction on each hip for 30+ seconds.
Joint Distraction: Hip Flexion
This exercise will help increase the Range of Motion in Hip Flexion, which is very beneficial to anyone who is looking to improve their Hip Mobility and get better at the squat or Deadlift.
Anchor the resistance band around a rack of a secure pole and then wrap the other side around your thigh as high as possible. Next, turn and face away from the anchor and walk out until the band is tight. Make sure that you position the band as high as possible on your thigh, as well as at the anchor point, in order to provide maximum affect at the Hip Socket.
Now, place your hands on the ground and walk out into a Down Dog position. Then sink the heels into the ground and press your tailbone to the sky as you make plenty of small adjustments and explore the various sensations of each position. Once you find the best line-of-action (stretch) in Down Dog, we are ready to apply a PNF Stretching Technique.
Next, cycle through a few phases of the Contract-and-Relax PNF Stretching technique and make even more of a positive difference in your Hip Flexion.

Finally, you can change up the line-of-action (stretch) even more by taking a hand and reaching for the opposite ankle. This is the Ankle Touch from the Down Dog series of Active Stretching. Make some more mirror adjustments and explore the various sensations until you can feel you have found a position that offers the best affect in regards to Joint Distraction.
Add in another few cycles of Contract-and-Relax here too.
Perform Joint Distraction on each hip for 30+ seconds.
Joint Distraction: Pigeon Pose
This next Joint Distraction exercise will use the Pigeon Pose from Yoga to improve Hip Mobility and simultaneously increase the Range of Motion in the three joint actions of: Hip Flexion, Hip Abduction and External Rotation.
This stretch is ideal for individuals that want to improve their ability to squat.
Anchor the resistance band around a rack or a pole and then wrap the other side around the middle of your thigh as you get into Pigeon Pose.
Get into Pigeon Pose by folding one leg under the torso and aligning the shin in a perpendicular angle to the spine the best as you can. Then lower your hips to the floor and walk your hands out as you lay your torso over top of your folded leg.
Now, you will want to make some mirror adjustments in your alignment in order to find the position that works best for you. In this exercise, everyone will experience a vast difference in what position works best for them. So, take some time to explore various positions and find an alignment that works best for you.
Once you have found the best positioning, it’s time to add in a few cycles of the Contract-and-Relax PNF Stretching technique. The combination of PNF Stretching and Joint Distraction in Pigeon Pose should do wonders for your Hip Mobility!
Perform Joint Distraction in Pigeon for 30+ seconds on each side.
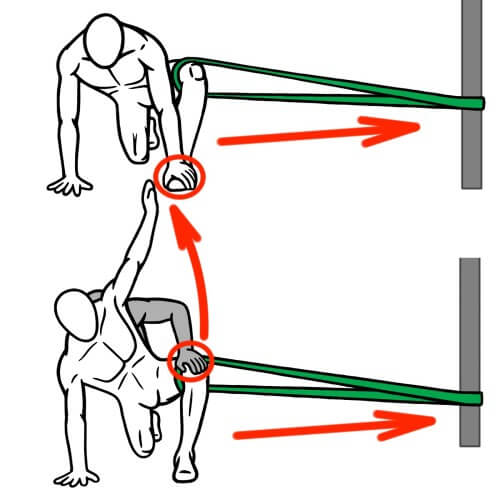
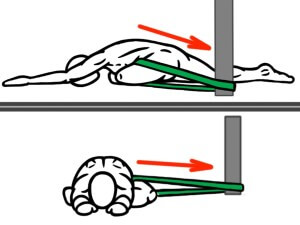
Joint Distraction: Bully Stretch for the Shoulder Girdle
This next Joint Distraction exercise will focus on your upper body, specifically your Shoulder Girdle. Many of us are too restricted through the anterior (front) side of our torso, including our Shoulder Girdle. This Distraction exercise will help to retract your Shoulder Girdle and release some tightness in your Chest, Lats and Trapz.
This stretch is ideal for individuals that have protracted Shoulders and overdeveloped Pectorals (Chest) and Lats (Back). Perfect to use before and after Upper Body Pushes and Pulls, i.e. push-ups, pull-ups, presses and more.

Anchor the resistance band around a secure rack or a pole that is elevated and then wrap the other side around your shoulder. Make sure that is can securely pull your Shoulder Joint backwards into Retraction.
Now, walk forward until the band gets tight and then reach the bound hand up your back towards your heart.
You will want to make some mirror adjustments in your alignment in order to find the position that works best for you. We want to feel the musculature of the chest and shoulder opening up. So, take some time to explore various positions and find an alignment that works best for you.
Once you have found the best positioning, it’s time to add in a few cycles of the Contract-and-Relax PNF Stretching technique. The combination of PNF Stretching and Joint Distraction in this Bully Stretch will do wonders for your Shoulder Mobility.
Perform Joint Distraction in Bully for 30+ seconds on each side.
Joint Distraction: Thoracic Spine Extension
Now, you can also use a foam roller to perform distraction on your torso.
This exercise is going to help expand the anterior (front) side of our Thoracic Spine, which tends to be very tight and restricted on many people.
This exercise is perfect for anyone that lacks mobility through their Thoracic Spine and this usually includes people who work on a computer, drive a lot, do many ‘pushing’ exercises and/or wear heavy backpacks.

Place the roller on the ground and lay your torso over top of it. Position your heart directly over the roller. Interlace your hands behind your head and tuck your chin into your neck. No cranking the neck. Look up at the sky and lengthen the spine through the top of your head.
Now, focus on long, deep exhales and you activate the musculature in your upper back as if you are stretching first thing in the morning when you get out of bed. It should feel a bit like Cobra Pose in yoga and this little stretch/activation is all you need to start cycling in the Reciprocal Inhibition – PNF Stretching technique.
After your practice the PNF technique, change your position on the roller slightly. Move an inch or less in either direction – up or down – and then repeat another Reciprocal Inhibition PNF Stretch.
Keep making some little adjustments in your positions and find several spots that work well for you.
Perform Joint Distraction on your Thoracic Spine over a Roller for 30+ seconds.
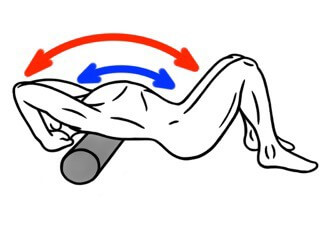
Joint Distraction: Arm Circles
We have another Joint Distraction exercise that we can perform on top of a roller for the Chest and Shoulders. In this exercise, we can combine Joint Distraction with Active Stretching and/or PNF Reciprocal Inhibition Stretching.
This stretch is ideal for individuals that want to open up the anterior (front) side of their Chest, Shoulders and Thoracic Cavity.

Lie on top of a foam roller with the roller positioned directly beneath your spine from head to tailbone. Then plant your feet firmly on the ground for support and drop your arms out to the sides.
Now, breathe and relax. Focus on making very large and deep exhalations to help your muscles release. Exhale out on a count of 8+ and inhale on 4.
Next, start to circle your arms up over hand as you keep your fingers in touch with the floor. If your fingers come up off the floor, it’s an indicator that you are very tight through the anterior (front) side of your torso. You will want to include more Soft Tissue Therapy and Stretching to your Chest, Shoulders, Lats and even Traps.
Active Stretching: Move the arms smoothly and continuously as you bring your hands together overhead and then back down to alongside of your body. If you feel particularly tight areas, pass through them several more times as you focus on exhaling.
Remember that all of this is crucial as part of any good Recovery Strategy